Tuesday, December 29, 2009

Penne alla Vodka

Difficulty Rating:

This is one of my favorite recipes, not only because it's delicious and easy, but also because it has booze in it. And I like booze.

Recipe

1 tbls extra-virgin olive oil
1 tbls butter
2 cloves of garlic, minced
2 shallots, minced
1 c. vodka
1 c. chicken stock
32 oz can of crushed tomatoes
salt and pepper
1 lb penne pasta
1/2 c. heavy cream
fresh basil

Heat a large skillet over moderate heat. Add oil, butter, garlic, and shallots. Gently saute shallots for 3 to 5 minutes to develop their sweetness. Add vodka to the pan. Reduce vodka by half, this will take 2 or 3 minutes. Add chicken stock, tomatoes. Bring sauce to a bubble and reduce heat to simmer. Season with salt and pepper.

While sauce simmers, cook pasta in salted boiling water until cooked to al dente (with a bite to it).

Stir cream into sauce. When sauce returns to a bubble, remove it from heat. Drain pasta. Toss hot pasta with sauce and basil leaves.

Execution

The recipe is a teensy bit vague on how long to do things for, so I'll hopefully be able to help out with that. I also didn't get a picture of the ingredients because I had to rush to get ready for my trip, so you'll have to forgive me.

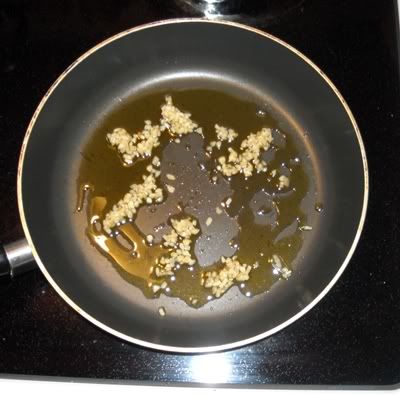
So, first thing's first - put the oil and butter in the pot and let it melt, then add the garlic and shallots.


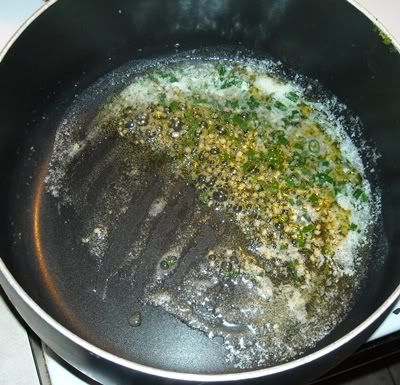
Cook that for about five minutes, and then add the vodka. Mmm, vodka.


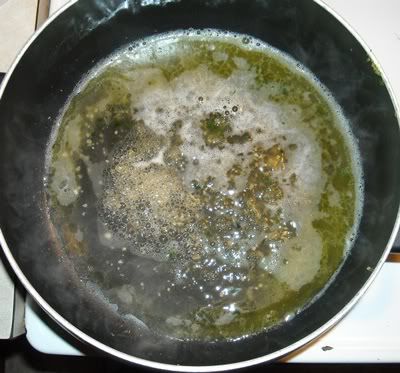
Also be sure to try the vodka to make sure it's safe. You wouldn't want anyone to get hurt.


Cook that down until it's about half as much as you had before. Make sure you stir it because if you don't the garlic will burn.


Now, the recipe calls for a 32 ounce can of crushed tomatoes, but I can only ever find 28 ounce cans, so just buy two and add about a bit from the second one. Also add salt and pepper and, if you can't get fresh basil, add dried basil at this point. I sometimes add a bit of garlic powder if I want it to be extra garlicky.


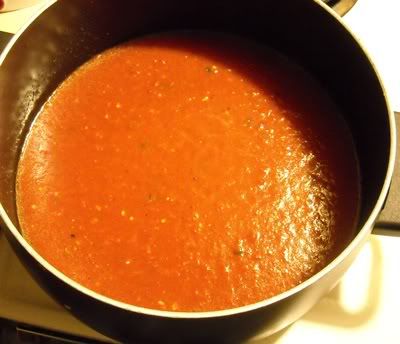
Now is when you should put your pasta on to boil. You want the sauce to cook for a while, about as long as it takes for you to boil water and then finish cooking the pasta. It won't be super-thick when you're done, but it should cook down at least a little bit. Now, the recipe says to add the cream and then let it come to a boil and then you're done, but I like to let it simmer for another five minutes or so. Then you just pour the whole shebang over your cooked pasta and serve with some parmesan cheese.


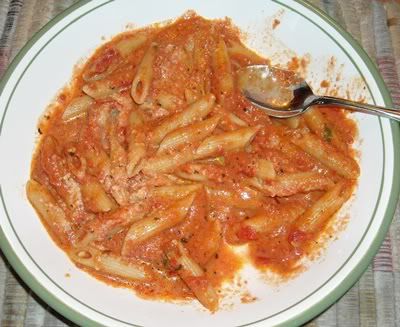
It's seriously nummy. You can also add some grilled chicken if you want, or if you want to go vegetarian (which I did for these pictures since my sister's a filthy veggie-eating hippie) you can use vegetable stock instead of chicken stock. As a side note, they didn't have any vegetable stock at the store, so we bought a can of Progresso vegetable soup and just drained it and used the liquid. It's all about improvisation, people. Serve it with toasty garlic bread and enjoy!

Friday, December 18, 2009

Trailer Park Toffee

Difficulty Rating:

I can't believe I'm putting this on the website. This may be the weirdest thing I've ever made, and when I saw the recipe for it, I giggled and said it sounded like the strangest thing ever. I disbelieved. And then it was done, and I tried it... and then I ate, like, four more pieces. So since I was very much against this recipe before I even tried it (for example, it is not actually called Trailer Park Toffee, I was just being a jerkface), I have decided to eat my crow as thoroughly as possible and post it up for the rest of you to try. Enjoy!

Recipe

1 sleeve of saltine crackers
1 c. light brown sugar
2 sticks of butter
12 oz bag of semi-sweet chocolate chips

Preheat oven to 400 degrees. Cover a cookie sheet with tin foil. Place crackers flat on foil to cover.

In saucepan, melt butter and add sugar. Boil, then reduce to medium heat and simmer for 3 minutes, stirring constantly. Pour and spread over crackers. Bake 7 minutes.

Remove from oven and let cool 3 minutes. Pour chocolate chips evenly over the crackers, then bake 30 seconds to soften up the chocolate. Remove and spread the chocolate to cover. Refrigerate.

Execution

I know what you're thinking - saltines don't make toffee! However, the crackers make it deliciously salty AND sweet. Oh man. I'm having to force myself not to go raid the fridge right now.

Ingredients


I know it only shows one stick of butter, but use two.

Lay out the crackers. Now, I learned the hard way that you should really curl the tin foil up around the edges. I'll show you why in a minute.


Melt the butter and add the brown sugar...


...stir it all together and bring it to a boil!


Boil it for about 3 minutes, until it gets kinda foamy. This is a a variable, because if you don't cook it long enough it'll stay liquid, but if you cook it too long it'll turn rock hard and you won't be able to eat it.

Once it's cooked, pour it over the crackers. This'll be messy, but it's okay!


Then spread it around if you need to. Don't worry, the ones on the edge won't be as gooey. It's to be expected.


However, this is when you'll learn why you should curl the edges up to keep the liquid from dripping off edges. Or at least put some clean baking sheets under it to catch the drips. Because stuff can and WILL catch on fire. Hence the need for all the baking soda.


Whee! Okay, well, everything's salvaged, so just keep going! Pour the chocolate chips over it, then stick 'em back in the oven for a minute, just long enough so that they start to melt, and then spread the chocolate out over the whole thing.


Put it in the fridge for a couple hours to firm up, then break it up into pieces and serve! Look at that... I mean, it looks delicious! And it is delicious! Who'da thought, huh?


Om nom nom... nom nom sticky om nom.

Wednesday, December 16, 2009

Pecan Pie

Difficulty Rating:


I'm not even going to lie - I forgot to take pictures of the stuff while I made it. But it's such an awesome and perfect recipe that I can't help but go ahead and post it! So all you get is the finished product and the recipe, but trust me when I say it's the easiest dessert to make in the world. Gordon Ramsey's tiramisu took more effort.

Now I know what you're thinking - if this is so stupid-easy, why is it a 4-Cookie Recipe? Well, that's just because pecans aren't that easy to come by in some parts of the world. I mean, in Mississippi I could literally just walk outside and pick them off the ground, but they're a bit harder to find here in New York City. But if you search around in some of the specialty markets, you should be able to find a bag. And keep in mind that pecans can be frozen for... well, forever, kinda. I had mine in the freezer for about two years and this pie turned out spectacular. It's only a 4-Cookie because of the one ingredient. Otherwise, easy as pie.

Yes, I went there.

Recipe

1/2 stick butter, softened
1/2 c. sugar
1 tbsp flour
1/2 tsp salt
2 eggs
1 tsp vanilla
1 c. pecans, chopped fine
1 c. Karo syrup
1 frozen pie crust

Using a fork, combine the butter and sugar. Add flour and salt and combine. Add the rest of the ingredients and mix well. Pour into pie crust and cook at 300 degrees for an hour.

Execution

A few notes on the ingredients.

Apparently, it is very odd outside of the South for people to leave butter on the counter. Everyone I know keeps it in the refrigerator where it stays hard as a rock and isn't any good for spreading on toast. So if you don't keep a stick of butter softened at all times, you can just put it in the microwave for 20 seconds to get it to the proper state. Just be sure NOT to melt it.

Also, you can cut the pecans up by hand but that gets rather messy. As I stated in the post on Kitchen Basics, I like to use a Food Chopper for such things. Noisy, but oh-so-convenient!

And it doesn't matter whether you use dark or white Karo syrup. I prefer dark if I have to just pick one. My grandma always mixes half of each. Up to you whether you want to shell out for the second bottle or not.

Now. To make it!

Throw the softened butter and sugar in a bowl and squish it up with a fork until it's combined completely. That's exactly what my recipe says, by the way: squish!

Add in the flour and salt, and squish again. It may threaten to get a teensy bit dry, but the main point is to try not to leave any big chunks of butter unmixed.

I like to add the eggs and vanilla, mix again, then the pecans, mix again, and then the syrup, but my gramma just dumps it all in at once and stirs it up. It'll end up a sloppy, gooey brown mess either way. Mmmm. Sugary syrup.

Pour this into a pie crust - I like the 9" deep dish ones best. As a side note, those come two to a package, so I usually double the recipe and just make two pies, but that's entirely up to you. You can decorate it with unchopped pecans if you like; my gramma covers the whole top in them, but I like to make a design so I can avoid them when I cut myself a piece. Weird as it is, I hate whole pecans. The only way I'll eat them is in this pie.

Pre-heat your oven to 300 degrees and cook the pies for about an hour. I find it usually ends up being a little more than that, but I start checking it after an hour.

Knowing when your pie is done is a somewhat subjective artform in and of itself. The best thing to do is to check it about 45 minutes in: open the oven and (using an oven mitt, of course) jiggle the rack gently. You'll see the middle of the pies wiggle as if they're still all liquidy. This is what you are trying to overcome - you do NOT want a jiggly middle.

How like life, huh?

So after an hour, check it every five minutes or so. Just jiggle it slightly to see if the middle has firmed up yet. Don't be tempted to turn up the heat, because doing so will just burn the crust on your pie instead of cooking it any better. Be patient, and eventually you'll jostle the thing and it'll just sit there and be all brown and perfect.


Like that! How awesome is that? A Southern delicacy, all for you. Here's a close-up so you can see what the consistency looks like:


Now, you can, of course, serve it immediately, but it'll fall apart a bit when you try to get it onto the plate. If you let it sit a little while it'll firm up a bit more and be easier to serve. Since it's made of syrup and butter, you don't really have to refrigerate it as long as you're gonna finish it within the week. And really, who could possibly leave a pecan pie laying around for more than a week?? No one in my house, that's for damn sure.

Pasta with Chicken, Broccoli, and Oil

Difficulty Rating:

This one is totally my bad - I actually made this last month at my awesome friend Peter's house, and had such a great time there that I forgot I took all these pics for the blog. Good food and good company, man, this is what it does to you. Luckily I made a pecan pie and took a pic of it to put up here, and when I plugged my camera in I re-discovered all of these!

I must say, I've been lax in my blogging lately, but now that finals are almost over I should get back into the swing of things! So here, my lovelies, is a super-easy and surprisingly healthy dish for you all to enjoy!

Recipe

1 lb pasta shells, cooked
About 4 bunches of fresh broccoli florettes
1-2 cups extra virgin olive oil
3 tbls chopped garlic
About 1/2 lb chicken breast, cooked and cubed
Parmesan cheese
Salt & pepper

Add garlic and a few tablespoons oil to a skillet on medium heat and cook 2-3 minutes. Add broccoli florettes and cook until broccoli turns bright green. Add chicken and spice with salt & pepper, and cook until chicken is hot all the way through.

Add enough oil to fill pan about halfway up to the top of the broccoli, usually between 1-2 cups. Simmer on medium heat until broccoli is cooked to preferred consistency. Serve over pasta and sprinkle with parmesan cheese.

Execution

This is by far one of my favorite dishes. I could literally eat this every night for a week.

Ingredients


Peter's kitchen is soooo much nicer than mine. Look at those countertops! Mine are that fakey-marble blue. Yuck.

Now you're more than welcome to cook and chop your own chicken, we were just looking for something quick so we got the Deli-Fresh kind. You can also make this without meat at all; this was actually the first time in almost ten years of making this dish that I put chicken in it, but I was super-hungry and wanted meat.

As for the "broccoli florettes," all this means is you're only using the top part of the broccoli. Cut off all the stems, and then just chop the top of the broccoli up into smaller pieces so they're bite-sized. You'll get little green things everywhere, but it's worth it.

You can also use fresh garlic which I usually do, but again, I was going for quick and delicious so I used jarred. Dump in a couple spoonfuls of garlic and a bit of oil to cook it in.


DO NOT let the garlic burn! This is very important, because the garlic is in this for the long haul. Just stir it around for a minute until everything smells like garlic, then dump in your broccoli. Stir it around so it soaks up some of the oil, and let it cook a little. If it gets too dry, throw a little more oil on there. Your goal isn't to drown it or pan-fry it here, just to keep it sort of moist with the oil.

Once it starts turning bright green (is there anything prettier than cooked broccoli?), throw in the chicken.


You'll want to cook this another few minutes so the chicken absorbs some of the garlicy flavor and mingles with the broccoli. You should also add salt and pepper to taste.


Mmm! Now, if you're watching your figure you can just throw this on some pasta and go, but trust me when I say it'll be dry. So suck it up, remember that olive oil is good for your heart, and pour a bunch more in. I usually add it until it's about halfway to covering the broccoli concoction, as shown below.


I know it looks like a lot of oil at first glance, but remember that you're throwing this over an entire pound of pasta, so don't be shy! Let this simmer for a few minutes - the oil should turn a bit cloudy from all the other ingredients - until the broccoli is the consistency you prefer.

Then you just put some pasta in a bowl and spoon the broccoli concoction over it. I like shells the best, because there's all kinds of little niches that the oil can get stuck in and make it extra delicious.


Note #1: See what I meant about getting little green thingees everywhere?

Note #2: I am so jealous of Peter's dishes. Oh man.

Now, at this point you sprinkle some parmesan cheese over it and chow down. I like a lot of cheese, practically negating any healthy benefits of eating this meal, but how much you add is entirely dependent on your own love of cheese.

Once you've had your fill, throw the rest of the pasta into a tupperware container, pour the remaining oil from the pan over it, and eat it later with some more cheese. Mmmm, cheese.

Thanks again to Peter for helping me make this excellent meal!